Paper Squishies

If you're a parent or kid or really anyone that is on social media, you've been aware of the new craze for squishies. Actually, squishies/stress balls have been popular and around for more than a decade, but lately, the production and hype around these toys are both increasing dramatically. Almost all squishies (the most popular dumpling stress balls, for example) are made of thermoplastic rubber (TPR) or polyurethane (PU) foam. Both materials are non-degradable and time-consuming to recycle, not to mention recycling smaller volumes of TPR is not a good economical decision for companies.
Luckily, you can make a super easy and just as satisfying alternative at home, if not more satisfying to squeeze the product of your hard work! This lesson was among the favorites with my young students (aged 4-6), so really anyone can make it within a short amount of time!

kids' sample
Materials: (w/ substitutions in parenthesis)
A4 printer paper (sticky notes)
Clear scotch tape
Markers (colored pencil for realistic ones)
Scissors
Used plastic bags (dry polyester packing from Amazon)
Step 1:

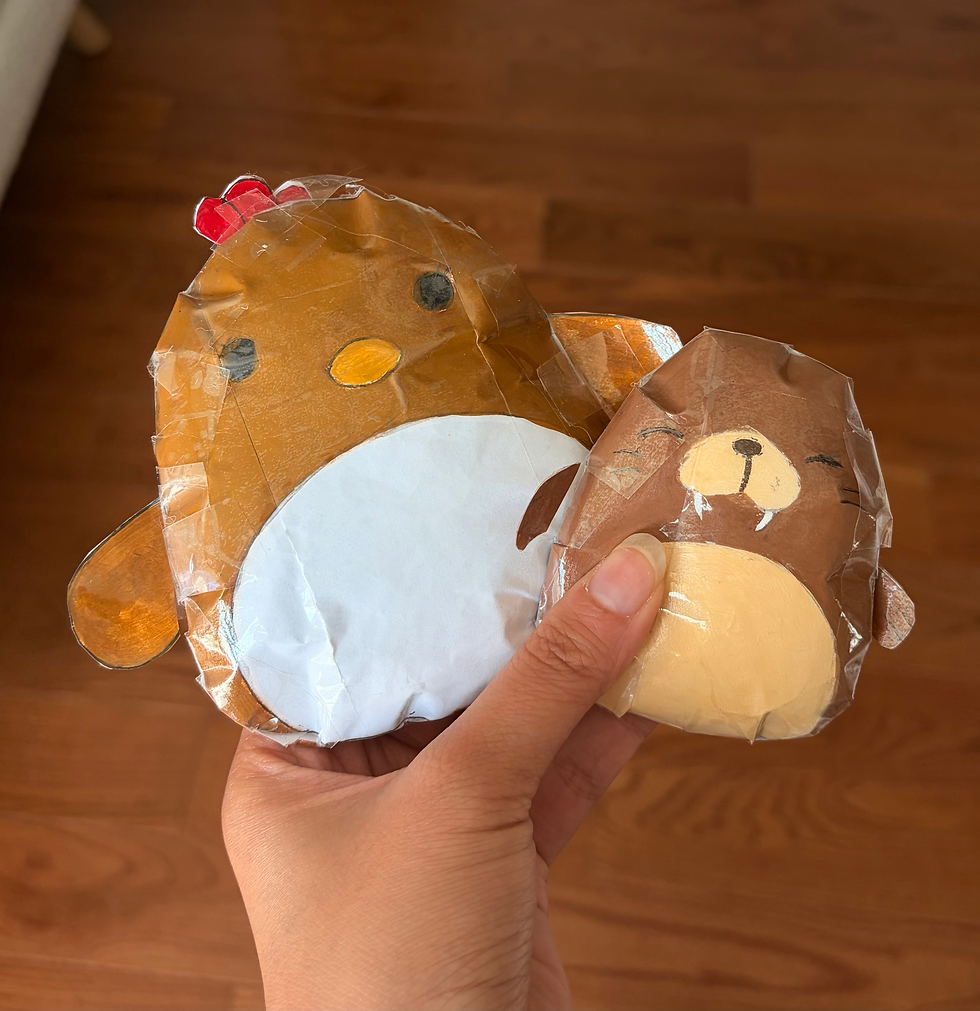
First, you need to choose a subject to turn into a squishy! I taught the children about endangered animals in this lesson, and I chose red pandas from this concise list of endangered animals (2026). Feel free to just do a favorite animal however, as doing Squishmallows is also a popular choice, as I've attached below. The chicken and walrus Squishmallows was something I made when I was quite young, but it's definitely held up.
Step 2:

This step is pretty complex, but it's also lowkey the entire tutorial in one image, so I'll break every sub step down carefully!
Fold a piece of A4 paper in half, making a tall rectangle (NOT a long one)
Draw your design & color it in; when cutting, cut both folded flaps at the same time to try and get the exact same shape
🌟 Put a red X on the top side of the blank flip you cut out so you don't accidentally put tape on this side! Think about it, if you taped this inner side, then the back flap would be inverted and would no longer align perfectly with the front side of the squishy when you tape both sides together! This is a little tricky, so make sure you understand this step
Put your 2 flaps down so that the side you're taping is facing up. Notice for the back flap, the side I drew an X on is NOT visible? Then, put as many pieces of clear scotch tape as you need to excessively cover both flaps. 🌟 Do this step on a surface where you can easily peel the tape off of, such as a countertop. I used the cover of a plastic notebook, but really anything works.
3 continued. Peel off the back-flap so that its sticky side is facing up. Put your filling (plastic bag or actual doll filling) on the top of the red X and make sure it's contained within the flap. Peel off the top flap and put the two sticky sides together.
Step 3:

Cut the edges off of the tape so that there's about 1/4" of space between the paper and the edge of the squishy. Now you're done! The tape is there to both prevent the paper from ripping and adhere the top and back half of the squishy together. This was a great gateway for me and my class to talk about endangered species and work on some more complex motor skills. Also, to use up some of those grocery bags instead of letting them go to the trash! let me know what you guys think!


Comments